FaceTime was only available for Apple users. That was a big hindrance to Windows & android users. Therefore, Apple comes up with a new update on their iOS 15 that enables both Android & Windows users to connect with FaceTime and continue meeting on the same platform. Though it’s a new update, this app has everything as before.
For instance, screen recording FaceTime with Audio iOS 15 has become a useful feature. You can connect to your friends with FaceTime and start recording the screen and audio on iOS 15 by tapping the control button. Then, select the screen record and choose the audio option. That’s the simple process for recording both screen & audio on iOS 15.
In today’s writing, I’ll go through some easy & simple steps to show you how you can screen record with audio using iOS 15 or any Apple device, including MAC, iPhone, iPad, and more.

About iOS 15 & FaceTime
As I said, FaceTime was only available and usable for Apple users. Unfortunately, that means Windows & android users still need to get the chance to connect with their friends who use FaceTime. It’s a great barrier; Apple realized the problem and came up with a solution with their iOS 15 that enables users to connect Android & windows to this app and ensure a smooth video/audio calling experience.
That means an Android user, a Windows user, and an Apple user can now easily join together with FaceTime if the Apple user has iOS 15 or the latest one. It’ll also allow you to record the audio and the screen simultaneously without issues. And FaceTime has also introduced some updates with new features that ensure users can enjoy their FaceTime with their fellows.
The below video talks about the screen record with audio on FaceTime. Get through for a while.
Steps to Screen Record FaceTime with Audio iOS 15
Screen record has become a popular choice since it allows users to keep a record of their entire screen along with the audio. However, here comes the most interesting part of getting the audio. In that case, you need to use the control or settings option while using FaceTime. So, let’s make it easier by following some simple steps.
Step 1: Open Your FaceTime & Settings
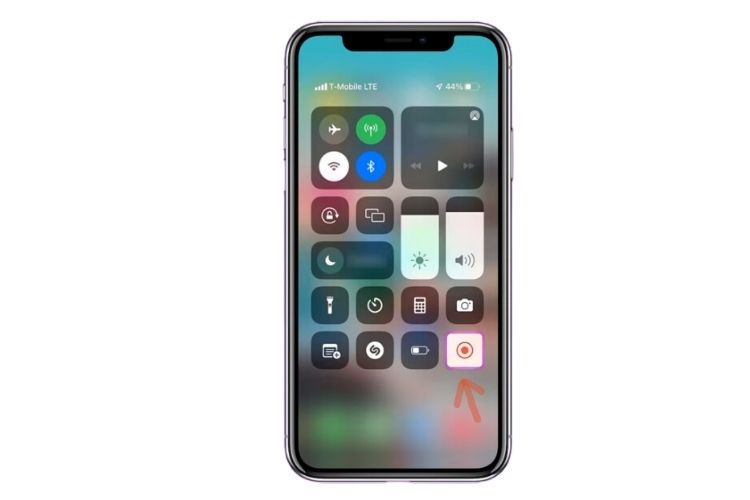
First, open your FaceTime & set your profile (only for the newbie). Once you set everything, you must check your settings and go to the control center. There, you will find the screen record option. Next, check the other options and customize them accordingly. For now, you only need to turn on the screen record option.
Step 2: Press & Turn on Your Microphone
The default option for audio recording is muted on most Apple devices. Therefore, you must set this option separately after turning on the screen record option. In that case, you need to start the screen record and press the button for a while until some new options appear.
There, you’ll find the microphone option. It needs to be turned on to record the audio and screen recording on your FaceTime.
Step 3: Connect Your Friends & Follow The Above Instructions
It’s time to practice your settings for the second time. Here, you need to connect your friends and turn on the screen record from the above. You’ll find it on the top after you’re swapping it down. Hold the option for three seconds, and the screen record will be started. Then, hold the screen recording option for a while unless it shows the microphone option that needs to be turned on (this option is for the very first time. You may start the screen recording if you already did it in your control center. The audio will be recorded as well.
How to Screen Record FaceTime with Audio on MAC OS?
Since MAC is slightly different from iPhone, you cannot follow the above steps and start recording the FaceTime screen and audio. You won’t find the control center here, but you should try the shortcut keyboard keys and enjoy your recording.
For instance, you need to press CMD+SHIFT+5.
Once you press these keys, you’ll get a new screen from your FaceTime. In addition, you’ll get to see two options at two corners. The top right corner is for selecting the particular screen from your Mac, and the left option is to record the entire screen.
Then comes the audio recording option. FaceTime on MAC has an automated audio recording option. Therefore, you can skip any further instructions. But first, you need to choose the record option.
After that, you must select the Options button to choose a particular drive or place where the recorded video will be saved automatically. Once you choose the place, it will show you the Capture button. Press on that; it will directly start the screen record of your Facetime with Audio like the iOS 15.
People Also Asked
FaceTime will record the audio once you turn on the microphone option from the Control Center. Once it’s turned on, it will record the audio and the screen.
Select the screen record option/button from the Control Center. There, you will find everything; even the audio recording option must be turned on from the Control Center.
Closing Words
Screen recording FaceTime with Audio iOS 15 has become much easier than before. You can do everything from the Control Center. First, enable the screen record option and press it for a long time until it shows the pop-up menu. There, the microphone option needs to be turned on. Only then can you screen record FaceTime with audio on your iOS 15.
Remember, screen recording on FaceTime is default without audio. If you want to add that, you need to follow the above steps to turn on the microphone & record both screen & audio simultaneously.

Leave a Reply