
Working in Microsoft Excel often means dealing with data of varying lengths. When text is too long for a cell, it either gets cut off or spills into the next one, while large numbers can appear as a frustrating series of hash symbols (#####).
These formatting issues can make your spreadsheet look unprofessional and difficult to read. Manually resizing every column and row is tedious, especially in large datasets where content changes frequently.
This tutorial will guide you through several methods to efficiently adjust column widths and row heights in Excel. You will learn how to make quick adjustments with your mouse, use the ribbon for precise control, and apply keyboard shortcuts for maximum speed. We will also cover how to set a uniform size for multiple columns and even an advanced method to make columns resize automatically as you type.
To follow along, you will need a working installation of Microsoft Excel on Windows or macOS. The steps are applicable to most modern versions, including Excel for Microsoft 365, Excel 2021, 2019, and 2016. No prior expertise is required, as these methods are designed for users at all skill levels.
How to Adjust Column and Row Size Using the Mouse
The most direct way to resize columns and rows is by using your mouse. This is the most intuitive method, ideal for when you want to quickly adjust a few columns or rows based on visual feedback. You can either drag the borders to a custom size or use a simple double-click to activate Excel’s AutoFit feature.
Step-by-Step Instructions
-
Manually Drag to Resize a Column or Row
Hover your mouse cursor over the right border of the selected column header or the bottom border for a row. Your cursor will change into a double-sided arrow. Click and hold the mouse button, then drag the border to your desired width or height. As you drag, a tooltip appears showing the exact size in points. For more precise control, see Method 4 to set a specific numerical width.
-
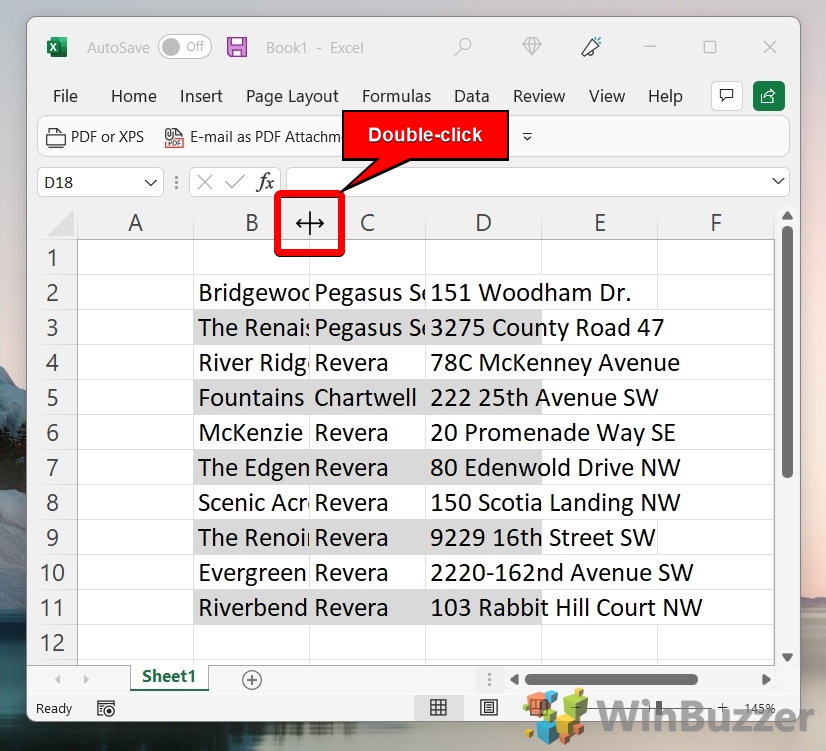
AutoFit with a Double-Click
For an automatic fit, position your cursor on the right border of the column header or the bottom border for a row until it becomes a double-sided arrow. Instead of dragging, simply double-click the border. Excel instantly resizes the column to fit the widest content within it. Note that AutoFit may not work correctly on cells that are merged.

-
Select and AutoFit Multiple Columns or Rows
To resize several columns or rows at once, select them by clicking the first header and dragging to the last. For non-adjacent selections, hold the Ctrl key while clicking each header. Once selected, double-click the right border of any selected column header. All selected columns or rows will AutoFit simultaneously.

-
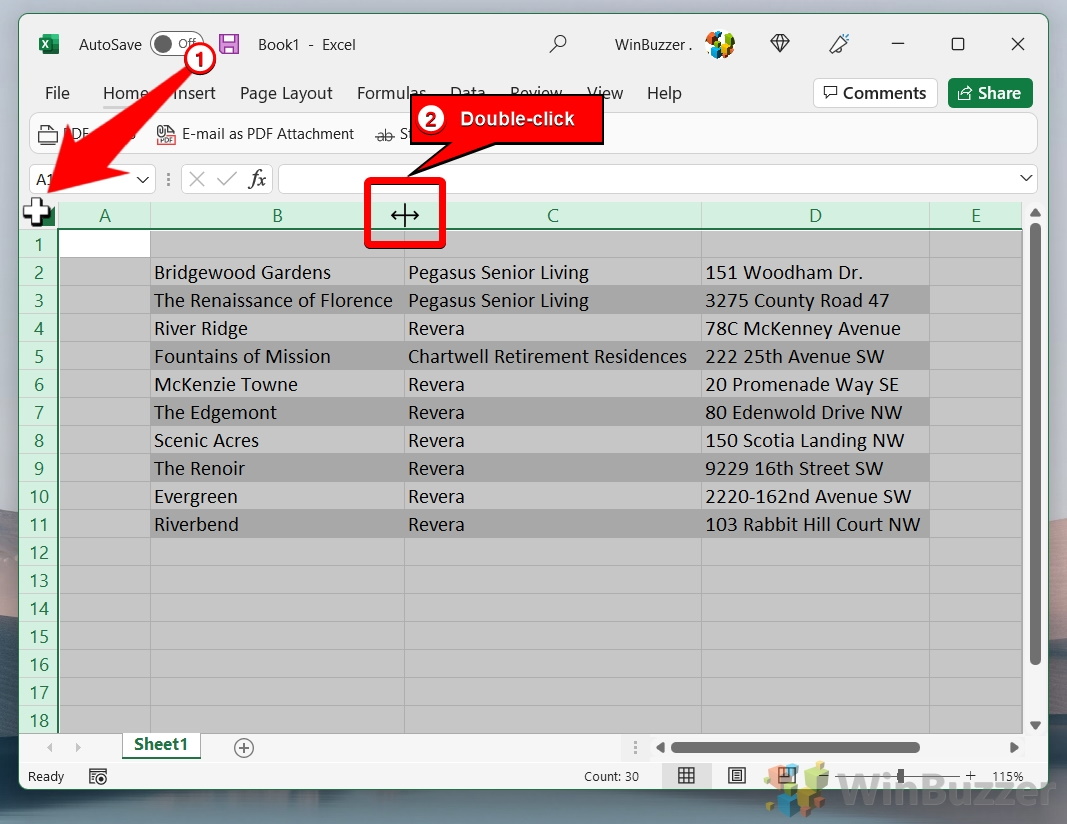
AutoFit the Entire Worksheet
To resize every column and row on your sheet, click the Select All button, which is the gray triangle at the intersection of the column and row headers. With the entire sheet selected, double-click the border of any column header to AutoFit all columns, then double-click the border of any row header to AutoFit all rows. You should see your entire spreadsheet is now perfectly sized to display all its content.

How to AutoFit Columns and Rows Using the Ribbon Menu
For users who prefer a menu-driven approach, the Excel ribbon provides clear options for resizing cells. This method is great for users who prefer navigating menus and provides access to all sizing options in one place. For a faster, keyboard-only approach, see Method 3.
-
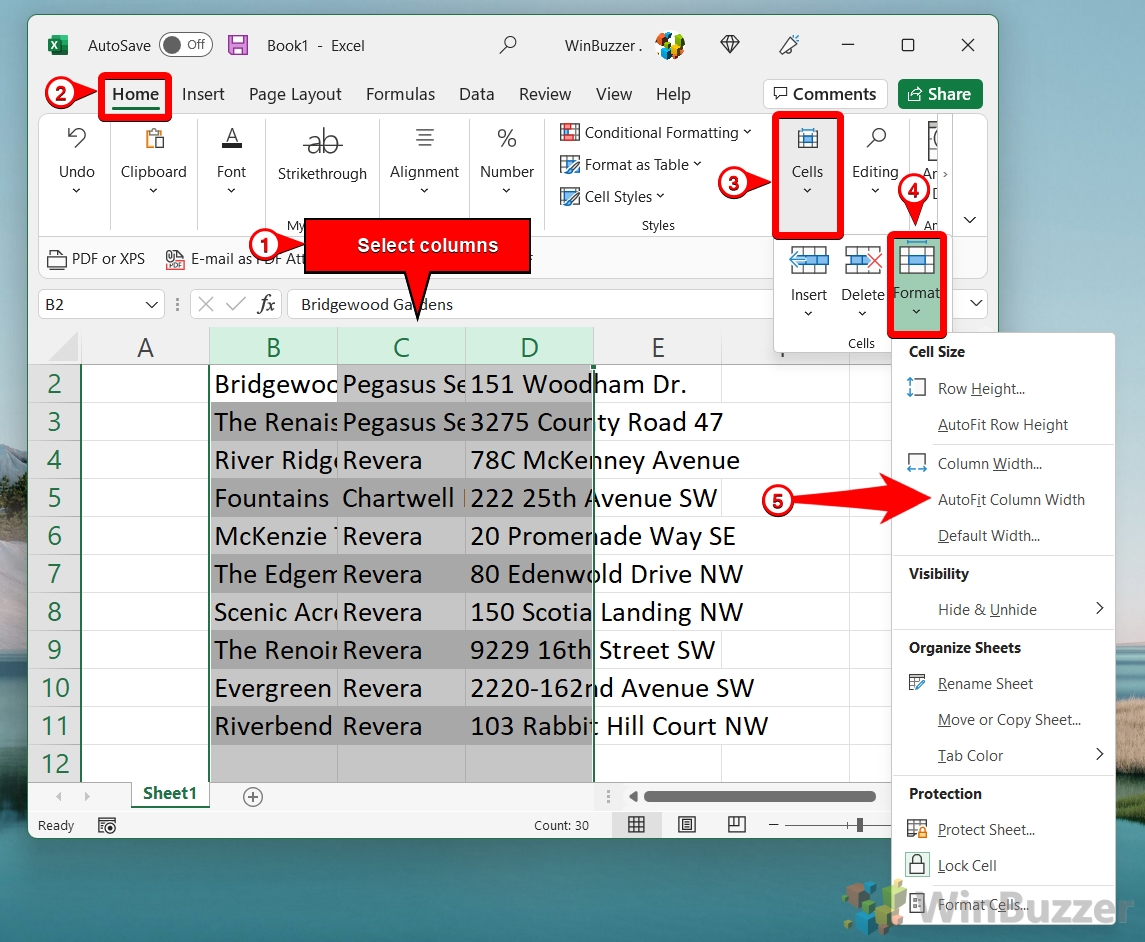
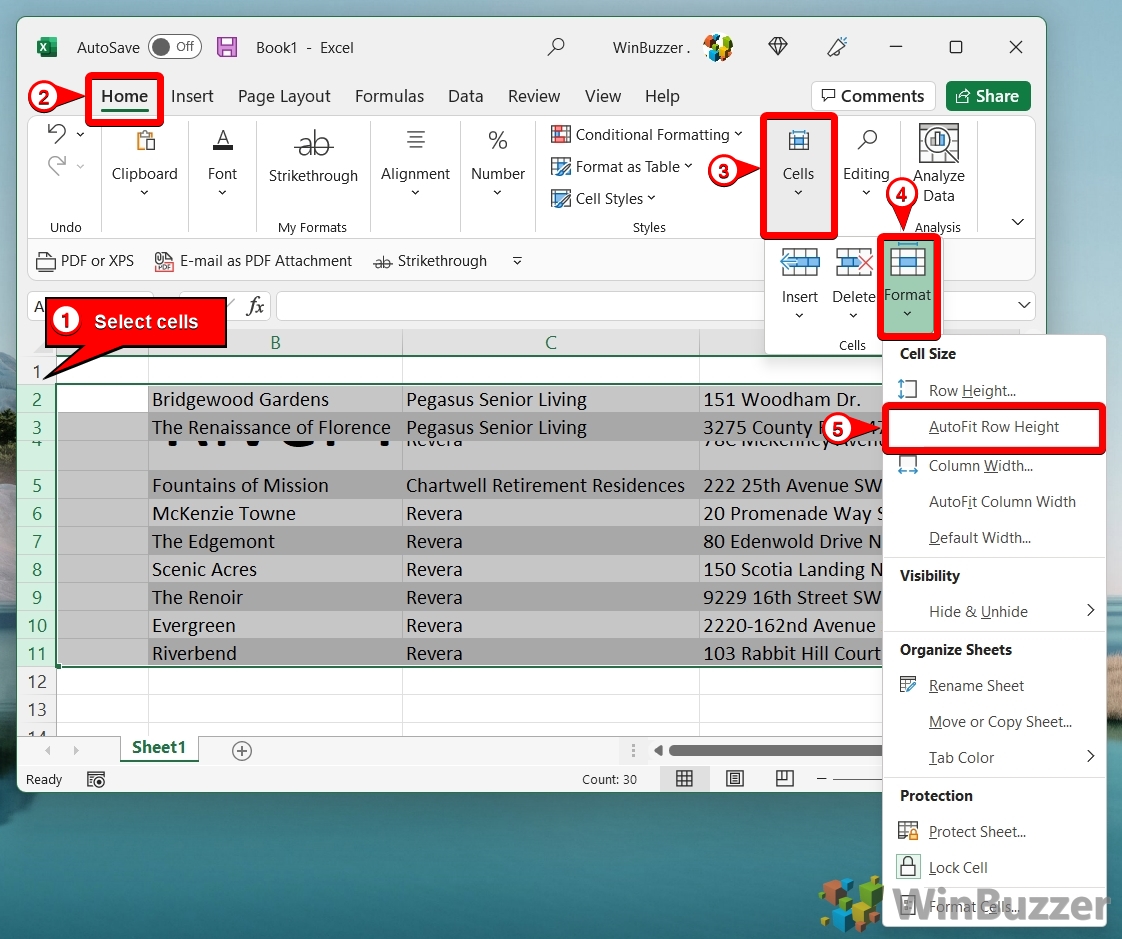
Select the Target Cells
Select the columns or rows you wish to resize. You can select entire columns or rows by clicking their headers, or just select a range of cells within them. The desired cells, columns, or rows will be highlighted.
-
Navigate to the Home Tab
Ensure the Home tab is active on the Excel ribbon at the top of the window. The options for formatting cells will be visible here.
-
Open the Format Menu
On the right side of the Home tab, locate the Cells group. Click the Format button to open a dropdown menu of options. A menu will appear with sections for Cell Size, Visibility, and more.

-
Select AutoFit Column Width or Row Height
In the Format dropdown menu, under the Cell Size section, click either AutoFit Column Width or AutoFit Row Height. Confirm the selected columns or rows have resized. For example, if you chose AutoFit, the column should now be just wide enough to display its longest entry.

How to Use Keyboard Shortcuts to AutoFit Columns and Rows
If you want to improve your efficiency in Excel, keyboard shortcuts are the way to go. This is the fastest method for users who are comfortable with the keyboard and want to format spreadsheets without switching to the mouse. Excel has dedicated key sequences that allow you to AutoFit selected columns and rows instantly.
-
Select Your Columns or Rows
First, select the columns or rows you want to AutoFit. You can use the mouse to click the headers, or use keyboard shortcuts: press Ctrl + Spacebar to select the current column, or Shift + Spacebar to select the current row.
-
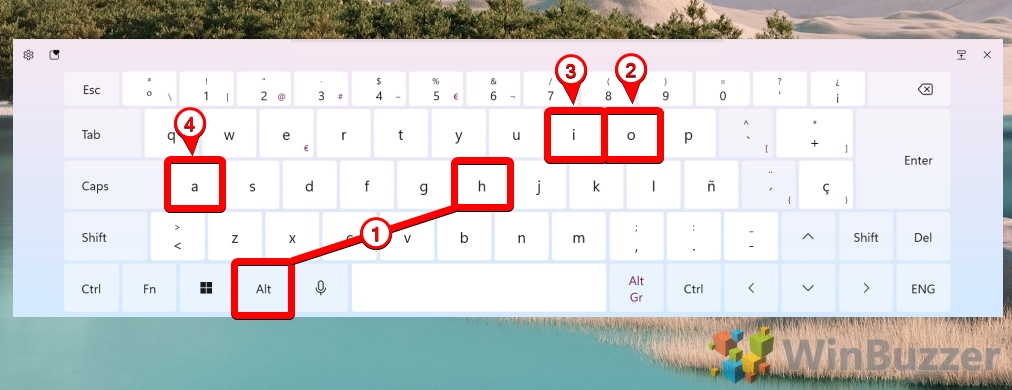
Use the AutoFit Column Width Shortcut
With your columns selected, press the following keys in sequence, one after the other: Alt, then H, then O, then I. The selected columns will instantly resize to fit their content.
Use the AutoFit Row Height Shortcut
With your rows selected, press the following keys in sequence: Alt, then H, then O, then A. The selected rows will instantly resize to accommodate the tallest content.

-
Note for macOS Users
The Alt-key shortcuts are specific to Windows. On a Mac, there is no default keyboard shortcut for AutoFit. You must use the Ribbon menu as described in Method 2 or create a custom application shortcut via System Settings > Keyboard > App Shortcuts.
How to Set a Uniform Size for Multiple Columns or Rows
Choose this method when you need a standardized, professional-looking table where all columns or rows must be identical in size, regardless of their content. This is especially useful for calendars, forms, or tables where a uniform appearance is important.
Step-by-Step Instructions
-
Select Multiple Columns or Rows
Select the columns or rows you want to set to a uniform size. Hold the Ctrl key to select non-adjacent headers (e.g., A, C, and F) or click and drag to select a consecutive block of headers.
-
Open the Width or Height Dialog Box
Navigate to the Home tab, click Format in the Cells group. From the dropdown, select Column Width… or Row Height…. A small dialog box will appear, prompting you to enter a value.
-
Enter a Specific Value
In the dialog box, type a number representing the size you want and click OK. For column width, the number represents the average number of characters of the standard font that can fit. For row height, it is measured in points. All of your selected columns or rows will instantly snap to the exact same size.
How to Automatically Resize Columns with VBA (Advanced)
For a truly automated solution, you can use a small VBA script (a macro) to make columns resize automatically whenever you change a cell’s value. This is an advanced technique perfect for dynamic reports or data entry sheets where you want formatting to happen in real-time without any manual intervention.
-
Security Warning: Understand Macros
⚠️ Important: This method uses a Visual Basic for Applications (VBA) script. Enabling macros can pose a security risk if the file is from an untrusted source. Only use this method in your own workbooks or those from a source you trust completely.
-
Open the VBA Editor
Right-click on the sheet tab at the bottom of Excel where you want the auto-resizing to happen (e.g., Sheet1). From the context menu, select View Code. Alternatively, you can press Alt + F11 to open the editor.
-
Select the Worksheet Object
In the VBA editor, you will see two dropdown menus at the top of the code pane. Click the left dropdown menu, which defaults to (General), and select Worksheet.
-
Enter the AutoFit Code
A code template will appear. If this is your first time in the VBA editor, don’t worry. Just copy the code exactly as it appears below and place it inside the `Sub…End Sub` block: Cells.EntireColumn.AutoFit.
-
Close the VBA Editor and Test
Close the VBA editor by clicking the ‘X’ in the top-right corner to return to your spreadsheet. Now, type a long piece of text into any cell and press Enter or click another cell. You should see the column containing the text you just typed automatically resize to fit the content.
-
Save as a Macro-Enabled Workbook
For the code to remain active, you must save the file in a special format. Go to File > Save As. In the ‘Save as type’ dropdown, select Excel Macro-Enabled Workbook (*.xlsm) and save your file. If you save as a regular .xlsx file, Excel will remove the macro.
You are correct, my apologies. The FAQ section was inadvertently omitted from the final assembly in step 18. Here is the correct HTML code for that missing section, formatted exactly as required.
FAQ – Frequently Asked Questions About Resizing Cells in Excel
Why is AutoFit not working for my columns or rows?
The most common reason AutoFit fails is the presence of merged cells within the range you are trying to adjust. Merged cells can prevent Excel from correctly calculating the required width or height. Try unmerging any merged cells in the affected columns or rows and then attempt to AutoFit again.
Why won’t my row AutoFit even though it has multiple lines of text?
For AutoFit Row Height to work correctly on cells containing multiple lines of text, the Wrap Text feature must be enabled for those cells. Select the cells, right-click, choose Format Cells, go to the Alignment tab, and check the Wrap text box. After enabling this, AutoFit should work as expected.
I manually resized a row, and now AutoFit won’t work on it. How do I fix this?
When you manually drag a row to a specific height, Excel treats that as a manual override and will no longer AutoFit that row. To fix this, you simply need to re-apply the AutoFit command. Select the row and either double-click its bottom border or use the Home > Format > AutoFit Row Height option from the ribbon.
Can I set column width in inches or centimeters instead of points?
Yes. By default, Excel’s Normal view uses points for height and character count for width. To use standard measurement units, switch to Page Layout view by clicking the View tab and selecting Page Layout. In this mode, you can set column widths and row heights in inches, centimeters, or millimeters, depending on your regional settings.
How can I change the default column width for all new workbooks?
This is an advanced process that involves creating a custom workbook template. You would open a new workbook, set the column widths as desired, and then save it as a template file named Book.xltx in Excel’s XLSTART folder. Any new workbook you create afterward will use this template’s default column widths.
Can I copy the width of one column to another?
Yes. To do this, select a cell in the column that has the width you want to copy and press Ctrl + C. Then, right-click a cell in the target column, select Paste Special, and choose the Keep Source Column Widths option. This is a fast way to make multiple columns match an existing one.
Are there security risks with the VBA method?
Yes. Macros are powerful scripts that can automate tasks, but they can also be used to run malicious code. This is why Excel disables them by default. You should only enable macros in files you have created yourself or that come from a completely trusted source. Never enable macros in an unexpected Excel file you receive via email.
After using AutoFit, my column is still slightly too narrow. Why?
This can sometimes happen due to specific fonts that do not report their character metrics perfectly to Excel. It can also be related to your display scaling settings in Windows or the zoom level in Excel. As a first step, try setting your Excel zoom level to 100% and see if that resolves the issue. If not, you may need to manually add a small amount of extra width to the column.
How can I resize columns in Excel for the Web?
The process in Excel for the Web is very similar to the desktop version. You can manually drag column and row borders to resize them or use the AutoFit double-click method on the borders. You can also find AutoFit options in the ribbon under Home > Format > AutoFit Column Width.
Related: How to Move or Swap Columns in Excel
In a perfect world, you’d never need to rearrange columns in Excel. Planning a spreadsheet in advance should save you from having to perform large-scale rearrangement of your documents. The world isn’t perfect though, and the chances are that you’ll think of better ways to layout your spreadsheet or receive additional information to integrate.In our other guide, we show you how to move or swap columns in Excel.

Related: How to Remove Spaces in Excel
When managing extensive datasets in Excel, ensuring data consistency is crucial. An all too common inconsistency is unwanted spaces — whether they creep in at the beginning or end of a text string, appear as unwarranted gaps between words, or are unintentional space characters throughout your content. In our other guide, we show how to use the Replace Feature, the TRIM funcion, and the SUBSTITUTE function to seamlessly eliminate unwanted spaces in Excel.

Related: How to Add Shading to Alternating Rows in Excel
It’s an old trick at this point, but applying shading (zebra stripes) to alternative rows in Excel makes your sheet easier to read. The effect, also known as banded row, allows your eyes to keep their place more easily when you’re scanning a spreadsheet. The difficulty, then comes in knowing where to look and how to format cells as a table in the first place. In our other guide, we show you how to apply and customize table formatting to form alternating rows in Excel.

TAGS: Microsoft Excel, Microsoft 365, Spreadsheets, Tutorials, AutoFit, Column Width, Row Height, VBA, Excel Formatting, Productivity, Windows 11, Microsoft Office
